NATIVE INSTRUMENTS KONTROL S8
SETUP
Drivers & Firmware
Drivers: (Windows only) : Install the Traktor Windows Driver (ASIO) from https://www.native-instruments.com/en/support/downloads/drivers-other-files/
No driver is required for Mac computers
Firmware: (for both Windows & Mac) Update the device firmware to the latest available version https://www.native-instruments.com/en/support/downloads/drivers-other-files/
VirtualDJ Setup
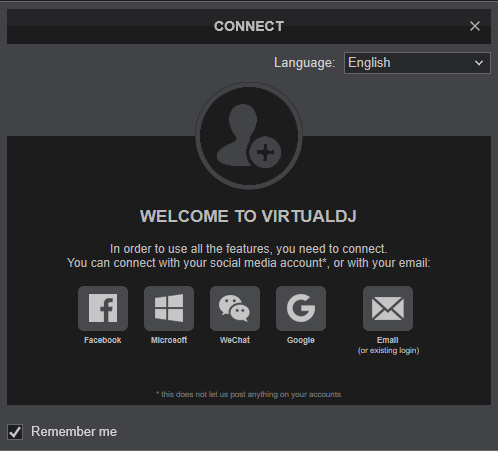
Once VirtualDJ is opened, a Connect Window will appear to choose one of the available ways to login.
A Pro Infinity, a Pro Subscription or a PLUS License is required to use the Traktor Kontrol S8. Without any of the above Licenses, the controller will operate for 10 minutes each time you restart VirtualDJ.
https://www.virtualdj.com/buy/index.html
Click on the Kontrol S8 button to allow VirtualDJ to auto-create the pre-defined audio configuration.
Click to OK
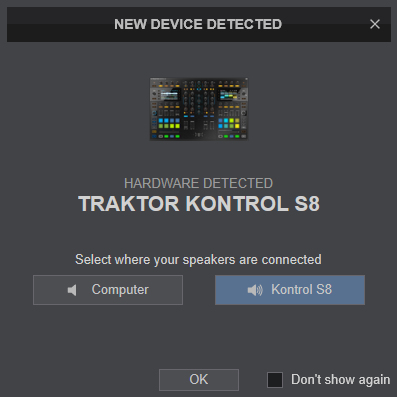
The unit is now ready to operate.
MIDI Operation.
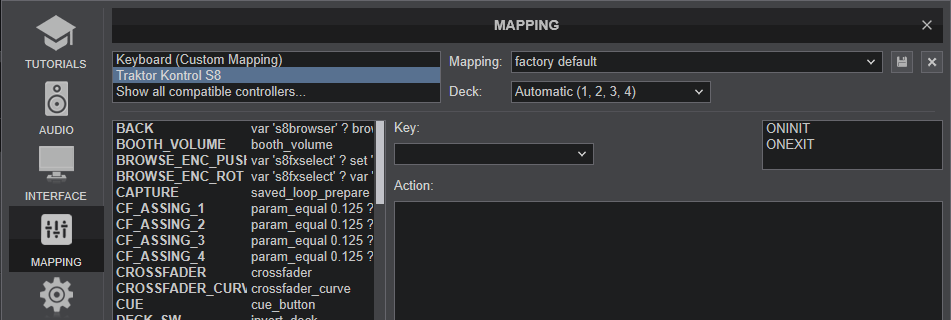
The unit should be visible in the MAPPING tab of Config and the “factory default” available/selected from the Mappings drop-down list. The factory default Mapping offers the functions described in this Manual, however those can be adjusted to your needs via VDJ Script actions.
Find more details at https://www.virtualdj.com/wiki/VDJ8script.html
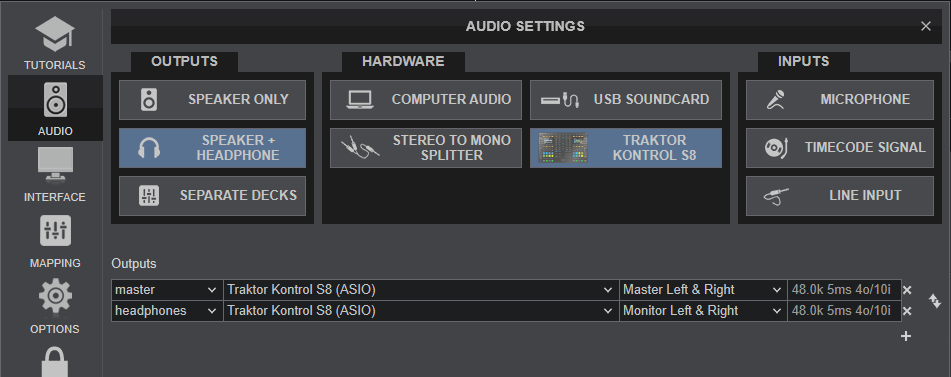
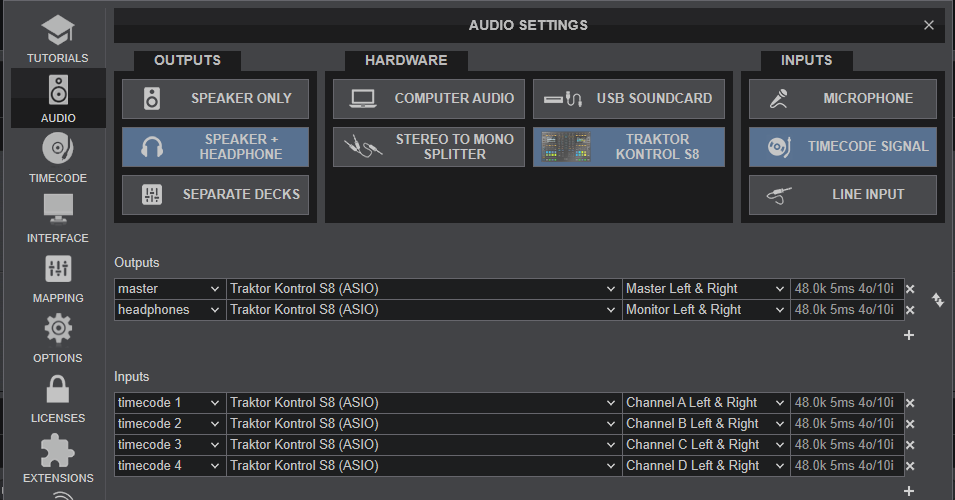
AUDIO Setup
The unit has a pre-defined Audio configuration and a special button in the AUDIO tab of Config to provide that. The default audio configuration requires speakers to be connected at the rear-side Master RCA or 1/8" sockets and headphones at the front panel 1/8" socket.
Refer to VirtualDJ Manual for alternative audio configurations https://www.virtualdj.com/manuals/virtualdj8/settings/audiosetup.html
For further software settings please refer to the User Guide of VirtualDJ.
https://www.virtualdj.com/manuals/virtualdj8/index.html
Layout
No content has been added for this category page yet..MIXER
- CROSSFADER: Blends audio between the left and right assigned channels/decks.
- VOLUME: Adjust the output volume of each deck
- PFL: Press this button to send this channel's pre-fader signal to the Cue Channel for monitoring. When engaged, the button will be lit.
- FILTER ON/OFF: Turn the selected Color FX on/off. When off, no Color FX will apply to the Deck. When on, the applied Color FX will depend on the FILTER knob position.
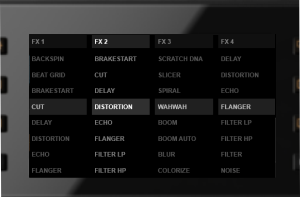
- FILTER: Applies the selected Color FX on the sound of the corresponding deck. When at middle position (12 o'clock) no Color FX is applied. The Color FX can be selected from VirtualDJ GUI. See Audio Mixer
- 3 -BAND EQ: Adjusts the low (bass) / middle (mid) / high (treble) frequencies of the corresponding deck. Stems is supported
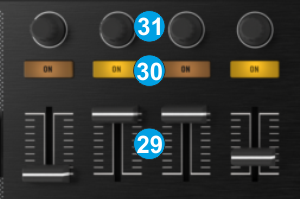
- FX BANK : Load Effect Banks 1 or 2 to a Deck. Hold SHIFT down and then use these buttons to save the selected Effect of the Deck to Effect Bank 1 or 2.
- SOURCE: When enabled (led lit) the corresponding mixer channel will control a VirtualDJ Deck. When turned off, the audio from the external source/input (connection at the rear panel), will go though this mixer channel and the VirtualDJ Deck will be muted.
- GAIN: Adjust the pre-fader output level (gain) of the corresponding deck.
- MASTER VOLUME: Adjust the level of the Master Output.
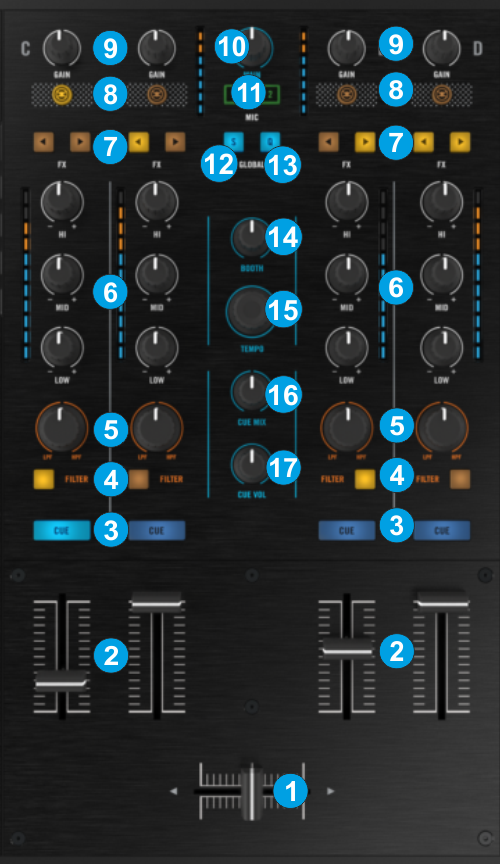
- MIC ASSIGN: Press the [1] / [2] button to assign the far most left/right mixer channel to Microphone 1/2 input respectively (connections at the rear panel)
- S: Enable/disable Smart Play to all Decks. When enabled, Tracks will be synced to the Master Deck when start playing.
- Q: Enable/disable Quantize to all Decks. When enabled, Hotcues and Loops will be quantized (snapped to the nearest beat or other value as defined in globalQuantize VirtualDJ setting)
- BOOTH VOL: Adjusts the level of the Booth Output (Connection at the rear panel)
- TEMPO: Not pre-defined to any function.
- CUE MIX: Turn to mix between Cue and Program in the Headphone channel. When all the way to the left, only channels routed to the Headphones channel (via the PFL buttons) will be heard. When all the way to the right, only the Program mix will be heard.
- CUE VOL: Adjust the output volume of the Headphones channel
DECK CONTROLS
S SHIFT.Hold this button down to access additional functionality for several buttons/knobs as described in this manual.
- PLAY: Play/Pauses the track.
- CUE: When the Deck is paused, you can set a temporary Cue Point by moving the Platter to place the Audio Pointer at the desired location and then pressing the Cue Button. During playback, you can press the Cue Button to return the track to this Cue Point. (If you did not set a Cue Point, then it will return to the beginning of the track.). If the Deck is paused, you can press and hold the Cue Button to play the track from the Temporary Cue Point. Releasing the Cue Button will return the track to the temporary Cue Point and pause it. To continue playback without returning to the Temporary Cue Point, press and hold the Cue Button, then press and hold the Play Button, and then release both buttons.
- SYNC: Use this button to match Tempo and Beat-Phase of the deck with the values of the opposite deck (or Master Deck if more than 2 decks are used). The Master Deck selection is made automatically by VirtualDJ, mostly depending on the Deck that is playing out in Master.
Hold SHIFT and then use this button to reset Deck's Tempo to its original value - NEEDLE SEARCH: When Track is paused, touch and slide to left/right to fine-position Track. When Track is playing, touch and slide to left/right to bend (temporary increase/decrease Tempo).
Hold SHIFT and then slide to left/right to Seek (Search) through the Track
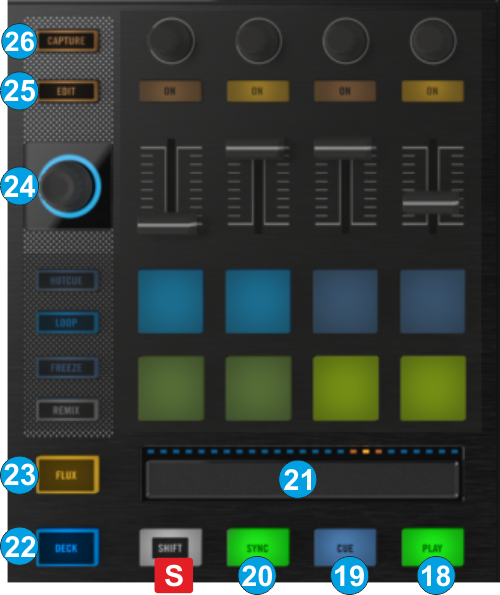
- DECK: Swap Left/Right Decks. Use the Left DECK button to toggle between Decks 1 (blue led) and 3 (white led). Use the right DECK button to toggle between Decks 2 (blue led) and 4 (white led)
- FLUX: Use this button to enable/disable Slip mode. When Slip mode is enabled, several functions such as Hotcues, Loops, Scratching etc, will act temporary (track will resume playback from the position it would have been if this function was never executed)
- LOOP: Turn left/right to half/double the size of the Loop. Push the encoder to turn on/off a Loop. Hold SHIFT down to move the loop backward/forward by 1 beat.
- EDIT: Not pre-defined to any operation
- CAPTURE: Use this button to save the current loop. when saved, use this button to enable/prepare the saved loop. Hold SHIFT down and use this button to delete the saved loop.
PERFORMANCE PADS
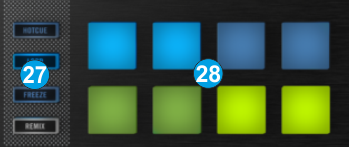
- PAD MODE. Press any of the 4 available Pad mode buttons to set the Pads to one of the following modes
[HOTCUE] : Hotcues page
[LOOP] : Loops page
[FREEZE] : Slicer page
[REMIX] : Sampler page.
[HOTCUE] 2nd press : KeyCue page
[[LOOP] 2nd press : Saved Loops page
[FREEZE] 2nd press : BeatJump page
[REMIX] 2nd press : Stems page
All the above pre-assigned pages can be changed. See VirtualDJ Manual - PADS. The 8 Pads offer different functionality depending on the selected mode.
The Parameters of each mode can be adjusted from the VirtualDJ GUI (Pads section)
Read further details about Pads in the VirtualDJ manual
SAMPLER
- GROUP VOL. Adjust the volumes of the first 4 Sampler Groups (if available).
These faders are touch-capacitive and will display the Sampler Group Volumes view on the display, as long as any of those is touched.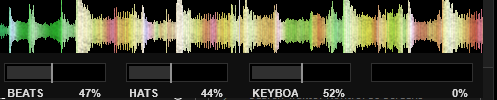
S8 Display - Sampler Group Volumes view - SAMPLER FX. Use the 1st button from left to apply the selected Effect to Sampler.
Use the the middle buttons to select the previous/next available Effect for Sampler
The 4th button is not used.
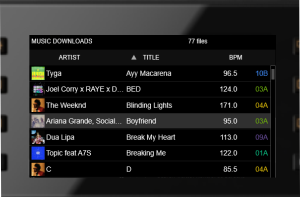
When in Browser mode, use these buttons to sort the Songs list by Artist, Title, BPM or Key. - SAMPLER FX KNOB : Use these encoders to adjust the first 4 Parameters of the selected Effect for Sampler (if available).
These encoders are touch-capacitive and will display the Sampler Effects view on the display, as long as any of those is touched.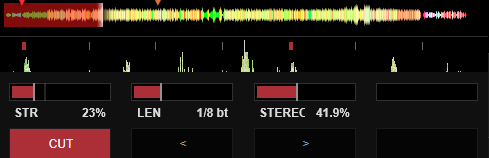
S8 Display - Sampler Effects view
BROWSER
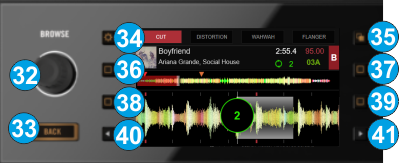
- BROWSE. Push to set Display to Browser view.
When in Browser view :
- Turn the encoder to scroll through Folders or Songs depending on the selected Browser list.
- Push the encoder to load the selected Track to the Deck.
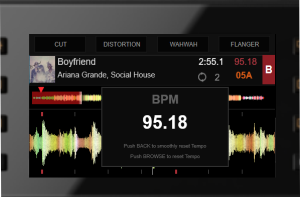
When in BPM view :
- Turn the encoder to increase/decrease Track's BPM (Tempo) by 0.01 step.
- Push the encoder to reset Track's Tempo to its original value
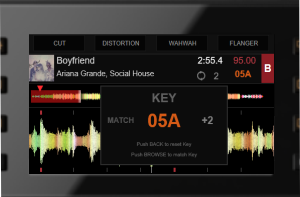
When in Key view :
- Turn the encoder to increase/decrease Track's Key by 1 semitone.
- Push the encoder to matchTrack's Key to the value of the opposite Deck.
When in FX Select view :
- Turn the encoder to select the Effect for the highlighted FX Slot.
- Push the encoder to close the FX Select view - BACK :
When in Browser view : Press to select the Folders list. When in Folders list, press to open/close sub-folders.
When in BPM view : Press to smoothly reset Track's Tempo to its original value
When in Key view : Press to reset Track's Key to its original value - SCREEN BUT 1 : Offers a hardware colors/brightness adjust panel.
- SCREEN BUT 2 : Returns to Decks view when Display is in Browser view. When in Decks view, use this button to toggle between 2 and 4 Decks view.
- SCREEN BUT 3 : Offers the Deck BPM view, to adjust Track's Tempo. Press again to return to the Decks view.
- SCREEN BUT 4 : Not assigned to any operation
- SCREEN BUT 5 : Offers the Deck Key view, to adjust Track's Key. Press again to return to the Decks view.
- SCREEN BUT 6 : Not assigned to any operation
- SCREEN BUT 7 : Zoom In the Deck's waveform.
When in Browser view, use this button to select the previous Browser list (Folders, Songs, Sideview). Hold SHIFT down and then use this button to select the previous Sideview list (Automix, Sidelist, Sampler etc) - SCREEN BUT 8 : Zoom Out the Deck's waveform.
When in Browser view, use this button to select the next Browser list (Folders, Songs, Sideview). Hold SHIFT down and then use this button to select the next Sideview list (Automix, Sidelist, Sampler etc)
EFFECTS
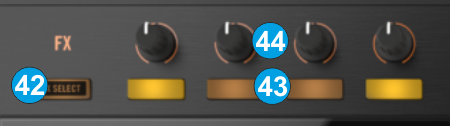
- FX SELECT : Press to get the FX Select view on the Display. Press again to go back to the Decks view.
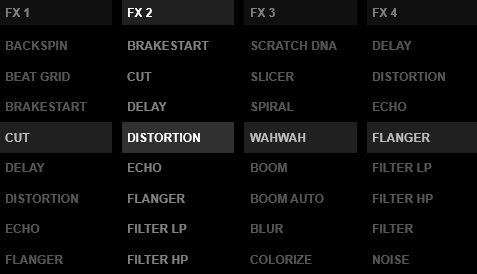
S8 Display - FX Select view - FX ON : Enable/disable the selected Effect on FX Slot 1 to 4.
When in FX Select view, use these buttons to select/highlight the FX Slot in order to select an Effect for it. - FX KNOB : Adjust the 1st Parameter of the selected Effects of FX Slots 1 to 4. Hold SHIFT down and then use these knobs to adjust the 2nd Parameter of the selected Effects of FX Slots 1 to 4.
These knobs are touch capacitive and will offer the FX Parameter overlay on the Display, as long as any of those is touched.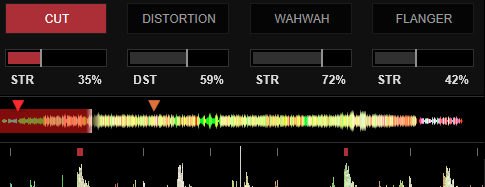
S8 Display - FX Parameter overlay
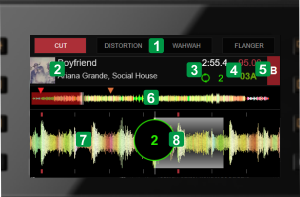
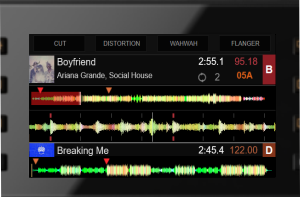
DISPLAY
The Display of the Kontrol S8 is using a pre-designed GUI (skin) , which is downloaded and installed automatically when the controller is first connected to VirtualDJ. The skin (named Traktor Kontrol S8 Screens.zip) can be found in /Documents/VirtualDJ/skins folder and can be customized to your needs. Note that this skin will not be visible in the INTERFACE tab of VirtualDJ and cannot be used as a main skin for VirtualDJ.
.
DISPLAY
FRONT & REAR PANELS


- MASTER OUT - RCA Alternative Un-Balanced Master Output. Connect your powered speakers or power amp here using RCA type cables. The level of this output is controlled by the MASTER VOL knob at the top panel
- MASTER OUT BALANCED Balanced Master Output. Connect your powered speakers or power amp here using XLR type cables. The level of this output is controlled by the MASTER VOL knob at the top panel
- BOOTH OUT Balanced Booth Output. Connect your Booth monitor speaker to this socket, using 1/4" TRS cables. The level of this output is controlled by the BOOTH VOL knob at the top panel
- INPUTS These sockets input sound to a mixer channel and supports both LINE and PHONO devices. The signal of each input will go through the respective mixer channel, if the Source button (top panel) is turned off. These inputs are part of the USB Audio Interface, and support Timecode-DVS and Live Inputs. See Advanced Setup.
- 2 x MIC INPUTS. Connect your microphones to these socket using XLR or TRS plugs.
- USB. This USB connection sends and receives audio and control information from a connected computer.
- POWER: Use the provided AC/DC power adapter to connect Kontrol S8 to a power outlet. Use the Power Switch to turn the unit on and off. Turn on S8 after all input devices have been connected and before you turn on amplifiers. Turn off amplifiers before you turn off the S8

Kontrol S8 - Front panel - CF ASSIGN. Assign a Mixer Channel to a side (A=Left or B=Right) of Crossfader, or choose the THRU position for the channel's output to be independent of the CF position.
- CF CURVE. Adjust the Crossfader behavior from Cut/Scratch to Smooth
- HEADPHONES SOCKET. Connect your 1/4" or 1/8" headphones to this output for cueing and mix monitoring. The level of this output is controlled from the top panel
INPUTS & RECORDING
The Traktor Kontrol S8 offers the ability to work as a standalone mixer, route the inputs to VirtualDJ as Live Inputs, as well as Timecode/DVS control.
Standalone mixer
This is the default setup with no Inputs in VirtualDJ Audio Setup. In this mode any external audio source connected through the Inputs of the S8 (rear panel) can be directly routed to each mixer channel when the SOURCE [8] buttons are turned off (the corresponding VirtualDJ Deck is muted in this case). Turn the SOURCE buttons back on, to mute the external audio source and route the VirtualDJ Deck back to the mixer channel.

LINE INS
The same Inputs can be also used to send audio signal from an analogue media source connected at the rear panel to VirtualDJ for processing.
Open VirtualDJ Settings ->AUDIO tab and press the LINE INPUT button from the INPUT tab
Click to Apply.

Turn off/on the SOURCE [8] buttons to enable/disable Line In routing to a VirtualDJ Deck.
This will provide the ability to synchronize BPM with other decks, use Effects etc.
Timecodes (DVS)
The Traktor Kontrol S8 is also offering DVS (Timecoded CDs and Vinyls) Support,
- Connect your Timecode devices to any of the Inputs at the rear panel
- Place the Input switches to either PH (Phono) or LN (Line) position depending on the connected signal device.
- Open VirtualDJ Settings ->AUDIO tab and press the TIMECODE SIGNAL button from the INPUT tab
- Click to APPLY
Use the TIMECODE On/Off buttons that will be offered on the Decks of VirtualDJ GUI to enable/disable Timecode control.
MICROPHONE INPUTS
The Traktor Kontrol S8 offers 2 Microphone Inputs (connections at the rear panel). Microphone input 1 is routed to the far left mixer channel and Microphone input 2 is routed to the far more right mixer channel.
Press the MIC 1/2 [11] button at the top panel to enable/disable the Microphone 1/2 input. When enabled (led will become green), the signal of each Microphone input will be routed to the corresponding mixer channel. Use the Mixer Volume fader to adjust its output level.
Same as the Live Inputs, the Microphone Inputs can be routed to a VirtualDJ Deck (to apply VirtualDJ Effects and record) if Line Inputs are included in VirtualDJ Audio Setup (see LINE INs mode above)
Note that when a Microphone Input is routed to a mixer channel (via the MIC 1/2 buttons), the respective VirtualDJ Deck 3/4 Decks will be muted.
Recording & Broadcasting
No need to make any adjustments for VirtualDJ to record your mix. Note that Microphone and Live Inputs will be recorded, only if those are included in VirtualDJ Audio setup (LINE INS mode)
